

How To Animate A Character In Blender For Unity
A Glossary of animation terms
Using Blender and Rigify
Blender now comes with a complimentary add-on called Rigify that provides your models with a biped rig that will work with Mecanim. This volition prove very useful for new and casual game developers.
This guide shows yous how to get your 3D model rigged with Rigify and imported into Unity's Mecanim. Rigify generates a full rig for your model and by using the armature as a template y'all will be able to forge it into a nice simple rig for humanoid characters. You should showtime by enabling Rigify within Blender then you can use its features. From in that location you will import your 3d model and begin to set up your model and armature correctly to avoid any problems subsequently down the line. One time everything is prepare-upwards yous tin can position the basic and generate your main rig. The trickiest office is skinning the mesh to the basic you wish to employ and ensuring they are parented correctly, and finally (later some testing and polishing) you can import into information technology into Unity.
Here is what you lot will need:
- Unity
- Blender
- 3D Humanoid Model (MakeHuman is very useful if you lot demand help with modelling).
Enable Rigify
Start you need to ensure that the Rigify add together-on has been installed and enabled within Blender:
- Get to File > User preferences.
- Select the Addons tab, and and then scroll to the bottom and click the check box adjacent to "Rigify"
- Click "Save User Settings"
This activates the improver and allows you access to the buttons and features needed. Setting it to default will include it with all your futurity projects.
Setting up your Armature
Grab a basic humanoid rig that Rigify volition utilise as a template. This rig is very basic simply information technology allows Rigify to build itself around the relative bone positions.
-
Add Human Armeture: Go to Add (SHIFT + A) > Armature (Human being)
-
Ensure both the armature and model are centred at 0,0,0
-
If you scale or motility the model make sure to reset the calibration and/or translation values of both the armature and model.

-
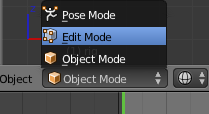
Go into edit mode (Printing Tab)
-
Begin positioning the bones in their respective place on the model
-
Use "10-Ray" to allow yourself to see the bones through the model
-
Once this is consummate, go back into object mode.
-
Motion the armature to the side and so it is out of the way. (If you are using Make Human, y'all may want to join the many different meshes into one complete mesh. Do this past selecting all the meshes and pressing CTRL + J)
Generating your Rig
-
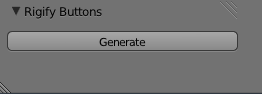
While the armature is selected click the Object data tab on the far right.
-
Under "Rigify Buttons" click Generate.
-
Switch to Pose mode and do the following:
-
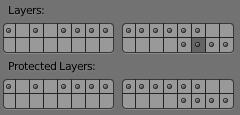
Press the (A) key to select the rig and then press the (H) key to hibernate the unwanted layers.
-
Shift click on the Armature layer below.
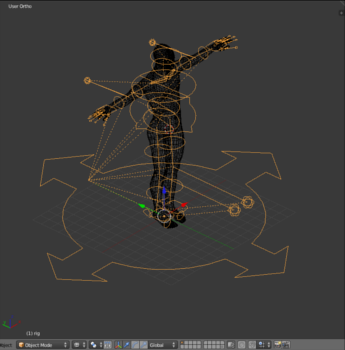
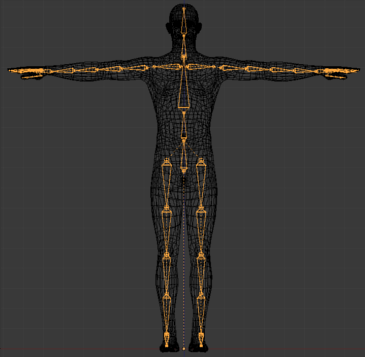
This volition reveal the deformation bones, the deformation bones are what you will need to skin and weight pigment your mesh to.
If all deformation bones do non appear cheque the "Motorcar Run Python Scripts" option nether File > User Preferences>File and re-generate
Deleting WGT bones
Y'all will discover in the superlative right corner in the scene's hierarchy y'all have many WGT-bones (WGT stands for Widget).
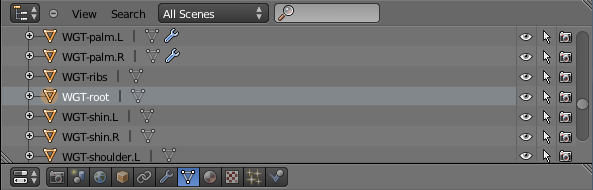
As these basic will not exist skinned to the mesh or used at all, nosotros volition need to delete them to avert having unassigned meshes in our Unity project. Right click on the bone and select "Delete". Do this for each WGT-bone in the scene.
Skinning the Rig to the Model
-
Skin the model to the deformation basic.
Before you offset, make sure you are in object mode and select the mesh, then concord shift and select the rig, printing Ctrl + P and select Armature deform > With Automated weights. This volition assign the mesh to the bones creating vertex groups, this is what we will employ for the skinning procedure. (If y'all take little or no cognition of skinning in blender take a look at the tutorial.) Note that the deformation bones will use two bones for each of the upper and lower limbs. Exercise not skin to the 2nd bone and ensure they are re-parented so that Mecanim will link them up correctly.
-
Skin your Shoulders to "DEF-shoulder.R" + "DEF-shoulder.L" and ensure their parent is "ORG-ribs"
-
Skin your Upper arms to "DEF-upper_arm.R.01" + "DEF-upper_arm.L.01" and ensure their parent is "DEF-shoulder.R" or "DEF-shoulder.L" respectively.
-
Skin your Forearms to "DEF-forearm.R.01" + "DEF-forearm.50.01" and ensure their parent is "DEF-upper_arm.R.01" or "DEF-upper_arm.Fifty.01" respectively.
-
Skin your thighs to DEF-thigh.R.01 + DEF-thigh.L.01 and ensure their parent bone is "ORG-hips".
-
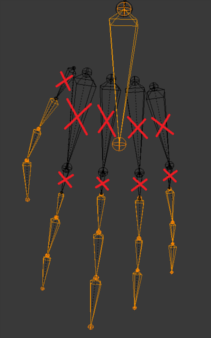
Skin your Shins to DEF-shin.R.01 + DEF-shin.50.01 and ensure their parent is "DEF-thigh.R.01" or "DEF-thigh.L.01" respectively. This will provide you with a rig that is skinned to the bones shown without an X through them. The spare bones should non be skinned to anything!

Do the same matter to the hands, just remember Mecanim will simply take the hand bone and iii bones for each finger and pollex. This ways you skin the model's hands to the bones without crosses through them as shown in the moving-picture show below.
-
In the same manner the hand must be parented to the correct basic. Peel your Hands to "DEF-hand.R" + "DEF-manus.L" and ensure their parent is "DEF-forearm.R.01" or "DEF-forearm.L.01" respectively.
For each finger and thumb yous will be using the following (left manus every bit an example):
* Pollex: "DEF-thumb.01.50.02", "DEF-thumb.02.Fifty", "DEF-thumb.03.Fifty" * Index: "DEF-finger_index.01.L.02", "DEF-finger_index.02.50", "DEF-finger_index.03.L" * Centre: "DEF-finger_middle.01.L.02", "DEF-finger_middle.02.L", "DEF-finger_middle.03.L" * Ring: "DEF-finger_ring.01.50.02", "DEF-finger_ring.02.L", "DEF-finger_ring.03.L" * Pinky: "DEF-finger_pinky.01.L.02", "DEF-finger_pinky.02.L", "DEF-finger_pinky.03.L" Remember that each finger bone should e'er be parented to the last and the first bone should be parented to the hand, providing a neat link for Mecanim to deal with.
Export and Import
Export the model every bit a .fbx and place information technology in a binder separate from your project. file > Export > AutoDesk FBX (.fbx) > Export. In one case this is done you lot can brainstorm to import it into Unity and go it linked up to Mecanim.
-
Open Unity and create a new project called "Rigify Test" one time it is open up, simply drag and drop your model into the projection window.
-
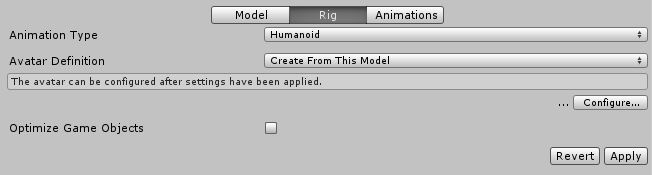
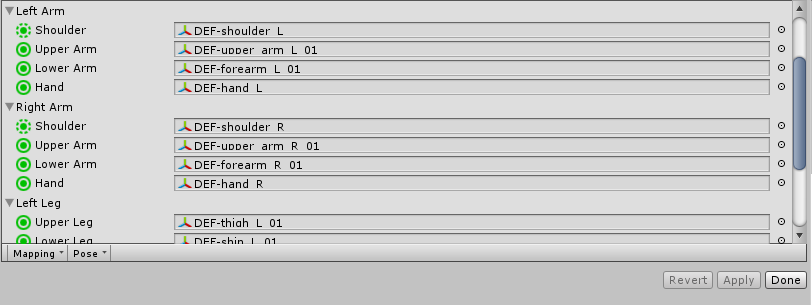
Select the model's prefab in the project window and click Rig in the inspector. Alter Animation Type to Humanoid and click Configure.
All the bones should now link upward nicely into Mecanim.
-
Ensure all bones are in the right places and that there are no errors.
A Glossary of animation terms
Source: https://docs.unity3d.com/560/Documentation/Manual/BlenderAndRigify.html
Posted by: grimesmorningard.blogspot.com
0 Response to "How To Animate A Character In Blender For Unity"
Post a Comment